

How To Change Well Pump Pressure Switch
How Do I Supervene upon My Water Pressure level Switch?
A pressure switch is responsible for turning the well pump on and off equally the water pressure inside the pressure tank changes. Just like any other mechanical component, information technology is bound to wear out, and will therefore need to be replaced from time to fourth dimension.
The signs of a faulty pressure switch are exhibited by a continuously cycling pump, low water pressure or a pump that does non outset, meaning no water in the firm. A bad pressure switch will demand to be replaced.
A new force per unit area switch will cost you between $20 and $30 assuming you have the necessary tools to supervene upon it. A professional person plumber will yet charge you upwards of $100 depending on your expanse.
Depression water pressure doesn't always mean you demand to supersede a pressure level switch. You lot could be having other problems with your well organisation equally I outlined in this mail.
To replace you well pump pressure switch, turn off power to the pump and drain the tank. Disconnect wires from the switch and remove it from the nipple. Install the new switch, connect the wires and turn power to the pump back on.
While the higher up is a full general statement of how you would exercise it, there are more steps involved as I will clearly show y'all in the residuum of the post.
What to Know While Replacing a Force per unit area Switch
As you already know, the force per unit area switch turns the pump on and off when the h2o pressure level in the tank changes. Pressure switches therefore accept 2 pressure level settings, a lower i and a college i.
The lower pressure setting when the pressure switch activates the pump is called the cutting-in force per unit area. After sufficient water has filled the tank, the pressure switch turns the pump off at the cut-off pressure.
While buying a new pressure switch, you demand to know its cut-in and cutting off pressures. There are 3 main pressure switch settings. twenty/40 psi, 30/50 psi and forty/60 psi. As you can run across, there is unremarkably a twenty psi difference betwixt the cut-in and cut-off pressure.
Your old pressure switch'south cut-in and cutting-off pressure will be written underneath its cover. If you were happy with your water pressure prior to the switch going bad, buy the exact same pressure switch.
If you weren't, you can purchase a force per unit area switch with a higher or lower pressure level settings. Having said that, I should also add together that a pressure switch's cut-in and cut-off pressures can exist adjusted as shown in this post.
That ways if yous have a pressure level switch with a cut-in pressure of 30 psi and cut-off pressure of 50 psi, y'all tin adjust it to have a cut-in pressure of 40 psi and a cut-off pressure level of 60 psi. You can also arrange the pressure differential by either increasing or reducing the cutting-off pressure.
Another thing to call up is that the force per unit area of the compressed air within the pressure tank should be 2 psi lower than the pressure switch's cut-in force per unit area. As you lot supervene upon the pressure switch, you will demand to check and adapt that pressure besides.
How to Replace a Well Pump Force per unit area Switch
For this project, you will need the following tools and equipment:
- New pressure switch
- Philips screwdriver
- Adjustable wrench
- Teflon tape
- Telephone/camera
- One-time toothbrush/wire castor
- Garden hose
- Multimeter/voltage tester
When you lot take gathered all the materials together, it is time to remove the old pressure level switch and install a new ane. The following are the steps to follow:
ane. Turn off Power to Well Pump
While replacing the pressure switch, you will be treatment naked wires which power up the switch. It is therefore paramount that the first affair y'all do is to turn off power to the well pump to prevent electric stupor.
Look for the breaker marked "Well Pump" on your main electrical panel and flip it to the off position. Improve nonetheless unplug the pump's ability string from the electrical outlet.
There is commonly a plastic cover on top of the pressure switch connected using a small nut. Remove the embrace and test if indeed power to the pressure switch has been cut off using the voltage tester/multimeter.
ii. Disconnect Wires from the Force per unit area Switch
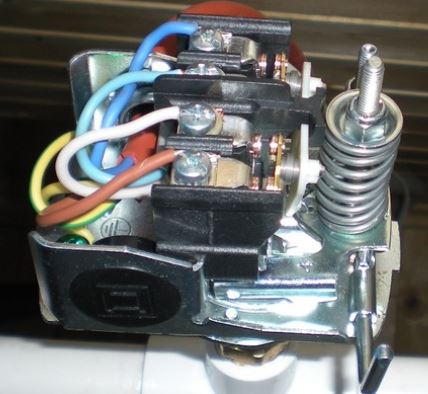
With the pressure switch cover out, you lot will see 4 electrical terminals, where at that place will be 4 wires tightened around screws. There volition also be a ground connexion at the lesser.
You will need a screwdriver to loosen the screws and pull out the wires. Before doing anything all the same, I would recommend that you grab your phone or a digital photographic camera and a take a picture of the connections.
That will help you subsequently in remembering exactly where each wire was connected. You can likewise become an extra step and mark the wires with a pen before taking the picture.
After taking the picture, loosen the screws and pull out the wires. Practice not forget the footing connection.
Note: It is very of import to check how the wires enter the pressure level switch opening. As you tighten the connections after, you lot desire the screws to take hold of the wires tightly. More on that afterwards in this post.
3. Drain the Pressure Tank
You cannot replace a pressure switch with well tank still full of h2o, unless yous want to try and see what will happen.
Before disconnecting the pressure switch, you will offset demand to completely drain the tank. This will also give yous the opportunity to check the pressure of the air chamber inside the tank and accommodate it if needed.
- Plow off the shut off valve from pressure tank to your house plumbing.
- Connect a garden hose on the boiler drain at the bottom of the tank.
- Direct the other terminate of the garden hose out into the driveway, yard or floor bleed.
- Turn on the drain valve and permit the tank drain out completely. This volition take a few minutes. Keep your optics on the force per unit area tank. When the water force per unit area drops to 0 psi, the tank will have drained out completely.
If your installation looks a picayune different and you don't have a banality drain at the bottom of the tank, you will need to bleed the pressure tank from the nearest faucet.
Note: Do non forget to turn off or featherbed water filtration equipment to prevent them from being clogged upwards by sediment.
four. Remove the Pressure Switch
Use a wrench to grab the force per unit area switch locknut and loosen it by turning it counterclockwise. If the connectedness is actually tight, I would advise that yous use a second wrench to back off on the piping (nipple) where the force per unit area switch is threaded on.
This prevents the pipage from loosening instead of the pressure switch. You can also spray penetrating oil or lubricant similar WD-40 on the connection and wait for about 15 minutes earlier attempting to loosen information technology once more.
5. Install the New Pressure Switch
- Utilize a toothbrush or wire castor to clean up the threads on the pipe/nipple. This is important in removing old Teflon tape and mineral deposits.
- Use about vi wraps of Teflon tape on the threads. Teflon tape should be applied in a clockwise direction, since it is the same management yous volition use to tighten the new pressure switch.
- Thread in the new force per unit area switch, starting off slowly to avoid cross threading. Tighten the connection with a wrench but not crazy tight.
- Connect the wires back as they were. Refer to the photo y'all took earlier and connect back the wires on the terminals. This fourth dimension round you will need to start with ground connectedness since it is at the lesser.
- If the wires are a little rusty, clean them upward with an emery fabric. This helps in creating a good contact.
Annotation: As I mentioned earlier, you will need to feed the wires in such a wire that they whorl around the screw from the left (clockwise) and not the right side. By so doing, the wires will course good contact as you tighten the screws.
- Install the Pressure Switch embrace
6. Check and Adjust Tank Pressure
As I had mentioned earlier, the pressure of the compressed air inside the pressure tank needs to be 2 psi lower that the pressure switch'southward cut-in force per unit area (This is for float/diaphragm pressure tanks not air-over-water tanks).
You should always cheque the pressure when the tank is empty. Now that your tank is already drained, remove the cap on the air inlet valve at the top of the tank and connect a tire guess. Check the pressure reading.
You can either bleed off pressure from the tank or add more using an air compressor or bicycle pump. 2-5 psi lower than the force per unit area switch's cutting-in pressure volition be ideal.
7. Turn on the Pump
With the new pressure switch in place, turn on ability to the pump. Make sure that the drain valve at the bottom of the tank is turned off.
Open the shut off valve to the house plumbing. To flush out air from the organisation, open a nearby faucet and only turn it off when information technology stops sputtering.
Practice not forget to turn on the filtering equipment back on.
And basically that is how to replace a well pump pressure switch. If indeed y'all had a faulty switch the water pressure problem will have been resolved.
On the other hand if the trouble persists, you may be having a faulty well pump. I have written a separate article about the signs that shows you demand a new well pump. Read it here.
Source: https://plumbingsniper.com/how-to-replace-a-pressure-switch/
Posted by: espinozaexuld1949.blogspot.com
0 Response to "How To Change Well Pump Pressure Switch"
Post a Comment